Dumas has recommend fiberglassing the deck and hatch at
this time. I have already added two coats to
finishing resin (sanding between coats) to seal the
deck. Fiberglass is not needed to provide
support/strength the the deck.
The Superstructure
What follows are instructions written by me, NOT
DUMAS. If you use these instructions, Dumas will
not be able to provide any support. I have received
many emails over the years asking questions about
building the superstructure. Questions where the
modeler is simply "lost in the construction process".
After I read through the instructions that Dumas
included in the kit, I can see how they are a bit vague.
So I will show you how I built mine. Remember,
this is only how I build mine, this not a "set" way.
Feel free to review my steps and build yours as you see
fit.
Cut out and mark the parts
for the superstructure.
Dumas tells you that the superstructure is built up on the
boat rather than on the building board, for the most part, this
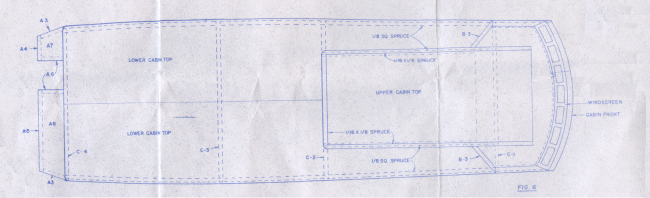
is true. You need to refer to figs. 3, 4, 5,
6,
on the plan for construction drawings. Study these
drawings.
Cement the 1/8" sq. spruce to the inside surface of the right and left,
upper and lower deck sides. Follow the drawings on the
plans as a guide. Also cement a piece of 1/8" sq.
spruce between the middle notches in C-1. This strip
will support the front edge of the lower cabin top.
Lay the port (left) lower cabin side on the bench then place the
upper cabin side in position and mark the lower cabin
side where C-2 should be located.
At this point I
assembled the following superstructure parts. I
used masking tape to tape the lower cabin sides to C-1,
C-2, and C-4. I placed the superstructure in the
deck opening and checked the fit. Make a mark on
the inside of the lower cabin sides at the location of
Frame 9. Check the fit of C-3. Remove the
superstructure and remove tape.
